
 https://www.everydaycheapskate.com/wp-content/uploads/20260611-June-prep-to-save-time-and-money-this-summer-beach-ball-in-pool.png
800
1200
Mary Hunt
https://www.everydaycheapskate.com/wp-content/uploads/EC-Logo-by-Mary-Hunt-Tagline-Trimmed.png
Mary Hunt2026-06-11 22:51:312026-06-11 22:51:31What I Prep Once in June to Save Time and Money All Summer
https://www.everydaycheapskate.com/wp-content/uploads/20260611-June-prep-to-save-time-and-money-this-summer-beach-ball-in-pool.png
800
1200
Mary Hunt
https://www.everydaycheapskate.com/wp-content/uploads/EC-Logo-by-Mary-Hunt-Tagline-Trimmed.png
Mary Hunt2026-06-11 22:51:312026-06-11 22:51:31What I Prep Once in June to Save Time and Money All SummerHow to Keep a Keurig Coffee Maker Making Coffee (Even if You Think It’s Broken)
shieldMary Hunt
calendar_todayMay 21, 2015
updateUpdated Jun 15, 2026
schedule7 min read
verifiedFact-checked

If you own a Keurig coffee maker and if it started out brewing a full cup of coffee then turned to a half cup and is now on its way to the landfill—you are not alone. There are many disgruntled Keurig owners out there.
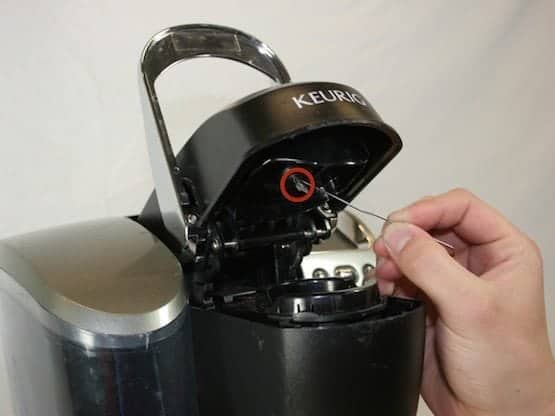
photo credit: IFixIt.com
That makes me wonder how many people have actually tossed a perfectly good Keurig coffee maker into the trash, when 30 minutes of their time, a slosh of white vinegar and a paperclip could have put that thing back into tip-top shape.
Hopefully, if you have a Keurig that’s giving you fits because the thing just will not work, you haven’t given it the ol’ heave-ho. I’m pretty sure it will be worth your time to get it back up and working.
Before I go on, let’s cover some disclosures: I do not use a Keurig. I roast my own coffee (the freshest, best coffee in the world) and brew it in this Bunn Coffee Brewer. I find the Keurig machines to be inadequate due to the single-serving feature and the disposable K-cups required to make the thing work are quite pricey.
With that out of the way, let’s get down to Keurig business.
Every Keurig coffee maker comes with instructions that it must be de-scaled routinely, and only Keurig Descaling Solution should be used. You do not need this product to get your Keurig coffee maker up and working. That’s because the biggest problem a Keurig has is getting clogged up with minerals from the water and from tiny bits of coffee grounds.
I’m no engineer, but it does seem to me that there is a design flaw somewhere in the Keurig empire. Older Keurig machines are notorious for giving a message that the machine needs to be descaled when in fact, the thing is hopelessly clogged.
Here is what you will need to fix and clean your Keurig machine: warm soapy water, a paperclip, a drinking straw, a soft cloth and about 30 minutes.
- Unplug the machine. Do not skip this step.
- Take the thing apart. First, remove the water tank and lid, then the stand that the cup rests on. Open the top to remove the K-cup holder.
- Wash all of these parts you took off the machine in warm soapy water, then dry them thoroughly.
- Partially unbend the paper clip.
- Keeping the top of the machine open, very carefully insert the free end of the paperclip into each of the three tiny holes that pierce the K-cup. This will be evident as you hold the thing up and look in that area. Those little holes are likely clogged with mineral build-up and debris, even though that may not be able to see that. Wiggle the paperclip while inserted in each of the holes. You won’t break anything because these are not working parts—only holes through which the water is dispensed that get clogged up.
- Turn the machine upside down. Smack it a few times with the palm of your hand to dislodge any other debris and scale.
- While the machine is still upside down, locate the spout. Place the drinking straw over it, grasp it tightly to seal the straw to the spout and blow into it. Blow hard! You want to force air through Keurig to clear the waterline. You guessed it: debris and scale in the line.
- With a cloth, clean the cup holder and the outside of the machine. Make it shiny like new.
- Put the thing back together, including the parts you washed and dried in Step 3.
- Fill the water tank with half water and half white vinegar. Run the machine without a K-cup until you’ve run through the entire reservoir of 50-50 water vinegar mix. Toss the hot smelly water down the sink (it will clean your drain pipes as well).
- Refill the reservoir with just water and repeat the process. Do it a couple of times until there is no trace of vinegar.
- Repeat Steps 10 and 11 once each month to maintain your Keurig.
If the machine ever begins to make less than a full cup or gets sluggish or stops altogether, repeat from Step 1.
By the way, if you are a Keurig owner, check out this refillable single-cup for most Keurig K-cup brewers (not compatible with Keurig 2.0). You can use your own coffee and save a bundle over the cost of individual K-cups.
Everyday Cheapskate participates in the Amazon Services LLC Associates Program, an affiliate advertising program designed to provide a means for us to earn from qualifying purchases, at no cost to you.

More from Everyday Cheapskate
https://www.everydaycheapskate.com/wp-content/uploads/20260611-June-prep-to-save-time-and-money-this-summer-beach-ball-in-pool.png
800
1200
Mary Hunt
https://www.everydaycheapskate.com/wp-content/uploads/EC-Logo-by-Mary-Hunt-Tagline-Trimmed.png
Mary Hunt2026-06-11 22:51:312026-06-11 22:51:31What I Prep Once in June to Save Time and Money All Summer https://www.everydaycheapskate.com/wp-content/uploads/20260610-how-to-cool-down-your-house-at-night-bed-with-window-and-view.png
800
1200
Mary Hunt
https://www.everydaycheapskate.com/wp-content/uploads/EC-Logo-by-Mary-Hunt-Tagline-Trimmed.png
Mary Hunt2026-06-10 18:37:072026-06-10 18:37:07The 10-Minute Nighttime Reset That Cools Down Your House
https://www.everydaycheapskate.com/wp-content/uploads/20260610-how-to-cool-down-your-house-at-night-bed-with-window-and-view.png
800
1200
Mary Hunt
https://www.everydaycheapskate.com/wp-content/uploads/EC-Logo-by-Mary-Hunt-Tagline-Trimmed.png
Mary Hunt2026-06-10 18:37:072026-06-10 18:37:07The 10-Minute Nighttime Reset That Cools Down Your House https://www.everydaycheapskate.com/wp-content/uploads/20260607-woman-grocery-shopping-pushing-cart-with-apples-and-cauliflower.png
800
1200
Mary Hunt
https://www.everydaycheapskate.com/wp-content/uploads/EC-Logo-by-Mary-Hunt-Tagline-Trimmed.png
Mary Hunt2026-06-09 23:20:292026-06-09 23:20:29How to Read a Grocery Store Sale Cycle (And Stop Overpaying)
https://www.everydaycheapskate.com/wp-content/uploads/20260607-woman-grocery-shopping-pushing-cart-with-apples-and-cauliflower.png
800
1200
Mary Hunt
https://www.everydaycheapskate.com/wp-content/uploads/EC-Logo-by-Mary-Hunt-Tagline-Trimmed.png
Mary Hunt2026-06-09 23:20:292026-06-09 23:20:29How to Read a Grocery Store Sale Cycle (And Stop Overpaying) https://www.everydaycheapskate.com/wp-content/uploads/20260604-Fathers-Day-activities-on-a-budget-dad-and-daughter-pointing-up-to-clouds-in-the-blue-sky.png
800
1200
Mary Hunt
https://www.everydaycheapskate.com/wp-content/uploads/EC-Logo-by-Mary-Hunt-Tagline-Trimmed.png
Mary Hunt2026-06-04 21:53:382026-06-04 21:55:20What to Do on Father’s Day: 30 Ideas He’ll Love
https://www.everydaycheapskate.com/wp-content/uploads/20260604-Fathers-Day-activities-on-a-budget-dad-and-daughter-pointing-up-to-clouds-in-the-blue-sky.png
800
1200
Mary Hunt
https://www.everydaycheapskate.com/wp-content/uploads/EC-Logo-by-Mary-Hunt-Tagline-Trimmed.png
Mary Hunt2026-06-04 21:53:382026-06-04 21:55:20What to Do on Father’s Day: 30 Ideas He’ll Love https://www.everydaycheapskate.com/wp-content/uploads/20260603-keeping-laundry-white.png
800
1200
Mary Hunt
https://www.everydaycheapskate.com/wp-content/uploads/EC-Logo-by-Mary-Hunt-Tagline-Trimmed.png
Mary Hunt2026-06-03 19:14:082026-06-03 19:16:53How to Keep White Clothes Actually White (Yes, It’s Possible)
https://www.everydaycheapskate.com/wp-content/uploads/20260603-keeping-laundry-white.png
800
1200
Mary Hunt
https://www.everydaycheapskate.com/wp-content/uploads/EC-Logo-by-Mary-Hunt-Tagline-Trimmed.png
Mary Hunt2026-06-03 19:14:082026-06-03 19:16:53How to Keep White Clothes Actually White (Yes, It’s Possible) https://www.everydaycheapskate.com/wp-content/uploads/20260501-bowl-of-salad-how-to-keep-greens-and-lettuce-from-wilting-and-getting-slimey.png
800
1200
Mary Hunt
https://www.everydaycheapskate.com/wp-content/uploads/EC-Logo-by-Mary-Hunt-Tagline-Trimmed.png
Mary Hunt2026-06-01 10:22:382026-06-01 10:24:52The Best Way to Store Salad Greens and Keep Them Fresh
https://www.everydaycheapskate.com/wp-content/uploads/20260501-bowl-of-salad-how-to-keep-greens-and-lettuce-from-wilting-and-getting-slimey.png
800
1200
Mary Hunt
https://www.everydaycheapskate.com/wp-content/uploads/EC-Logo-by-Mary-Hunt-Tagline-Trimmed.png
Mary Hunt2026-06-01 10:22:382026-06-01 10:24:52The Best Way to Store Salad Greens and Keep Them Fresh https://www.everydaycheapskate.com/wp-content/uploads/20260530-bright-contemporary-kitchen-how-to-fix-a-smelly-kitchen-sink-drain.png
800
1200
Mary Hunt
https://www.everydaycheapskate.com/wp-content/uploads/EC-Logo-by-Mary-Hunt-Tagline-Trimmed.png
Mary Hunt2026-05-30 13:19:232026-05-30 13:19:23How to Get Rid of a Smelly Kitchen Sink Drain for Good
https://www.everydaycheapskate.com/wp-content/uploads/20260530-bright-contemporary-kitchen-how-to-fix-a-smelly-kitchen-sink-drain.png
800
1200
Mary Hunt
https://www.everydaycheapskate.com/wp-content/uploads/EC-Logo-by-Mary-Hunt-Tagline-Trimmed.png
Mary Hunt2026-05-30 13:19:232026-05-30 13:19:23How to Get Rid of a Smelly Kitchen Sink Drain for Good https://www.everydaycheapskate.com/wp-content/uploads/20260523-hurricane-season-prep-warning-sign-with-dark-cloudy-sky-in-background.png
800
1200
Mary Hunt
https://www.everydaycheapskate.com/wp-content/uploads/EC-Logo-by-Mary-Hunt-Tagline-Trimmed.png
Mary Hunt2026-05-23 14:36:062026-05-23 14:36:08Hurricane Prep on a Budget: What You Actually Need Before June 1
https://www.everydaycheapskate.com/wp-content/uploads/20260523-hurricane-season-prep-warning-sign-with-dark-cloudy-sky-in-background.png
800
1200
Mary Hunt
https://www.everydaycheapskate.com/wp-content/uploads/EC-Logo-by-Mary-Hunt-Tagline-Trimmed.png
Mary Hunt2026-05-23 14:36:062026-05-23 14:36:08Hurricane Prep on a Budget: What You Actually Need Before June 1 https://www.everydaycheapskate.com/wp-content/uploads/20260522-how-to-honor-and-remember-memorial-day-flags-in-grass.png
800
1200
Mary Hunt
https://www.everydaycheapskate.com/wp-content/uploads/EC-Logo-by-Mary-Hunt-Tagline-Trimmed.png
Mary Hunt2026-05-22 15:16:422026-05-22 15:18:55Memorial Day Activities: How to Honor the Fallen
https://www.everydaycheapskate.com/wp-content/uploads/20260522-how-to-honor-and-remember-memorial-day-flags-in-grass.png
800
1200
Mary Hunt
https://www.everydaycheapskate.com/wp-content/uploads/EC-Logo-by-Mary-Hunt-Tagline-Trimmed.png
Mary Hunt2026-05-22 15:16:422026-05-22 15:18:55Memorial Day Activities: How to Honor the FallenPlease keep your comments positive, encouraging, helpful, brief,
and on-topic in keeping with EC Commenting Guidelines
Originally published at everydaycheapskate.com.
M
Written & reviewed by
Mary Hunt
Our editorial team researches and verifies every money-saving guide before publishing. Editorial policy · About us

